Costume Design Concepts

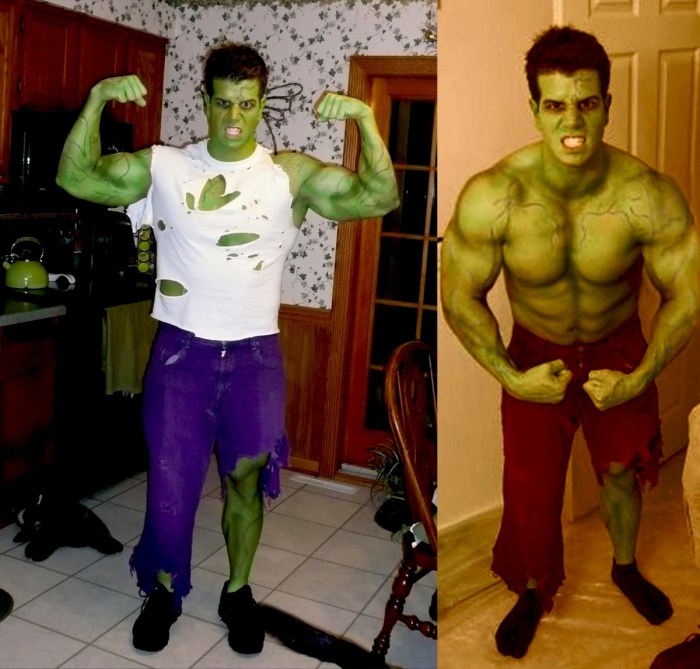
Crafting a DIY Incredible Hulk costume offers a fantastic opportunity for creative expression, ranging from simple to remarkably detailed designs. The choice depends heavily on your skill level, available resources, and desired level of visual accuracy. Below, we detail three distinct approaches, each with varying levels of complexity and material requirements.
Incredible Hulk Costume Concept 1: The “Basic Brute”
This design prioritizes simplicity and speed of construction. The focus is on capturing the Hulk’s essence without intricate detailing. It’s ideal for those with limited sewing skills and a tight deadline.Materials:
- One oversized, dark green t-shirt (several sizes larger than your own).
- One pair of dark green sweatpants or cargo pants (again, several sizes too large).
- Dark green fabric paint for added muscle definition (optional).
- Stuffing material (old towels, pillow stuffing) for added bulk (optional).
This concept relies on the sheer size of the clothing to create the Hulk’s imposing physique. Optional fabric paint can be used to add rudimentary muscle definition, and stuffing can enhance the bulk.
Unleash your inner superhero with a DIY Incredible Hulk costume! Crafting your own costume allows for incredible creativity and personalization. For inspiration on tackling a unique DIY project, check out this fantastic guide on luna lovegood costume diy , showcasing imaginative design and resourcefulness. The same spirit of inventive crafting can be applied to your Hulk costume, resulting in a truly memorable and powerful creation.
Remember, the most impressive costumes are the ones born from passion and personal touch.
Incredible Hulk Costume Concept 2: The “Muscular Marvel”
This approach aims for a more accurate representation of the Hulk’s muscular form. It requires intermediate sewing skills and more time commitment.Materials:
- Dark green spandex or Lycra fabric (sufficient yardage to create a full-body suit).
- Sewing machine and thread.
- Pattern for a muscular bodysuit (available online or through pattern companies).
- Green stuffing material (polyester fiberfill) to fill the suit and create muscle definition.
- Dark green felt or fabric for creating additional muscle details (biceps, triceps, etc.).
This method involves creating a custom-fitted bodysuit, allowing for greater control over the muscle definition. The use of stuffing and additional felt pieces will help sculpt a more realistic physique.
Incredible Hulk Costume Concept 3: The “Ultimate Hulk”
This is the most ambitious design, requiring advanced sewing skills and significant time investment. It aims for maximum visual accuracy and detail.Materials:
- Dark green foam sheets (various thicknesses for muscle definition).
- Contact cement or hot glue gun.
- Green fabric (for covering the foam).
- Sewing machine and thread.
- Detailed pattern for a muscular bodysuit (potentially custom-designed).
- Various paints and detailing materials to create realistic skin texture and shading.
This approach utilizes foam to sculpt the Hulk’s massive muscles, providing a three-dimensional and highly realistic effect. The foam is then covered with fabric and painted for a professional finish.
Costume Design Comparison
| Design | Cost | Time Commitment | Visual Impact |
|---|---|---|---|
| Basic Brute | Low | Low | Moderate |
| Muscular Marvel | Medium | Medium | High |
| Ultimate Hulk | High | High | Very High |
Clothing and Accessories
Creating a believable Incredible Hulk costume requires careful consideration of clothing and accessories. The design should prioritize both the visual impact of the character and the practicality of movement and comfort for the wearer. The following sections detail three distinct clothing styles, techniques for achieving the iconic ripped look, and suggestions for crafting key accessories.
Clothing Styles for the Incredible Hulk Costume
Three distinct clothing styles can effectively portray the Hulk’s powerful physique while maintaining practicality. The first style emphasizes a classic, slightly more restrained look, while the second and third options offer increasingly exaggerated renditions of the Hulk’s iconic rage.
- Style 1: Controlled Rage: This style uses dark, heavy-duty canvas or denim pants and a similarly robust long-sleeved shirt. The fabric should be pre-washed for a more worn look. Strategic ripping and distressing are key (detailed below), focusing on areas that suggest strain and exertion. The color palette remains primarily muted greens and browns, hinting at the Hulk’s underlying form.
This style is ideal for a more subtle, controlled interpretation of the character.
- Style 2: Unleashed Fury: This option maximizes the ripped and torn effect. The clothing should be made from lighter-weight fabrics like cotton twill or even burlap, allowing for more extensive tearing and fraying. The colors should be brighter, closer to the classic Hulk green, with visible muscle definition created through strategic placement of the rips and tears. This style embodies the unrestrained power of the Hulk.
- Style 3: Ultimate Destruction: This style takes the “ripped” aesthetic to its extreme. The clothing should appear almost completely destroyed, with large, irregular tears and shreds of fabric hanging loosely. The color can be a vibrant, almost neon green, emphasizing the character’s raw power and intensity. This option is best suited for a more theatrical or comedic interpretation of the Hulk.
Creating Ripped Clothing Effects, Diy incredible hulk costume
Achieving the signature ripped look of the Hulk’s clothing requires a combination of techniques. The key is to create a believable sense of wear and tear, avoiding a uniformly shredded appearance.
- Distressing: Use sandpaper, pumice stones, or even a cheese grater to abrade the fabric, creating a worn and faded look. Focus on areas where the fabric would naturally wear down, such as knees, elbows, and shoulders.
- Fraying: After distressing, create fraying by pulling apart the fabric’s threads. This creates a more realistic, less uniform look compared to simply cutting the fabric. Consider using a seam ripper to carefully loosen threads along seams and edges.
- Strategic Tearing: Carefully plan where to create larger tears. Avoid perfectly symmetrical rips; instead, aim for irregular, jagged edges that mimic actual wear and tear. Use scissors or a utility knife to create the initial tear, then further fray the edges.
- Fabric Paint: After distressing and tearing, consider using fabric paint to add details such as streaks of dirt, grime, or even blood splatter (for a more aggressive look).
Hulk-Themed Gloves and Boots
Creating Hulk-themed gloves and boots requires durable materials and attention to detail.
- Gloves: Start with heavy-duty work gloves or leather gloves as a base. Distress and rip them using the techniques described above. Consider adding padding for comfort and to enhance the muscular look. You can paint them green and add additional details like stitching or texture to enhance the effect.
- Boots: Use sturdy work boots or hiking boots as a base. These should be painted green and distressed similarly to the gloves and clothing. Consider adding details like mud or scuff marks to enhance the realism.
Additional Accessories
A range of accessories can significantly enhance the Hulk costume.
- Muscular Padding: Strategically placed foam padding under the clothing can enhance the Hulk’s massive physique. This is particularly important if the costume is worn by someone with a less muscular build.
- Damaged Belt Buckle: A large, heavy-duty belt buckle, preferably showing signs of damage or wear, can add a further touch of realism.
- Fake Scars and Bruises: Applying realistic-looking scars and bruises using makeup can heighten the effect of the costume, emphasizing the Hulk’s powerful and often violent nature.
Coloring and Finishing Techniques

Achieving a truly convincing Hulk costume requires meticulous attention to coloring and finishing. The process involves more than simply slapping on green paint; it demands a layered approach to create depth, texture, and a final product that’s both visually stunning and durable enough to withstand wear. This section details the essential steps and techniques to bring your Hulk to life.
Applying the Hulk’s Green
The signature Hulk green isn’t a single shade; it’s a complex blend that shifts with lighting. Achieving this requires careful consideration of paint type and application method. Acrylic paints are ideal for their versatility, durability, and ease of cleanup. For a smooth, even finish, consider airbrushing. This technique allows for precise control and subtle shading.
Alternatively, multiple layers of carefully blended brush strokes can create a similar effect, albeit requiring more time and patience. Remember, several thin coats are preferable to one thick coat to prevent cracking and ensure even coverage. Experiment with different shades of green—perhaps adding a touch of grey or even a hint of brown in the shadows—to add depth and realism.
Achieving Realistic Skin Texture
Simply painting the costume green won’t create a believable Hulk. To mimic the texture of his skin, consider incorporating various techniques. Dry brushing, for instance, uses a nearly dry brush with a darker shade of green to create subtle highlights and shadows, suggesting muscle definition. Sponging can add a mottled effect, creating a more uneven, textured surface.
Consider using a darker green mixed with a touch of brown to create shadows in the crevices of the muscles. For more advanced techniques, consider using a silicone-based molding compound to create raised muscle texture, then painting over the mold for a highly realistic effect. This method requires more skill and materials but yields exceptional results.
Sealing and Protecting the Costume
Once the painting is complete, protecting your hard work is crucial. A high-quality sealant is essential to prevent the paint from chipping, cracking, or fading. Several coats of a flexible acrylic sealant are recommended, allowing each coat to dry completely before applying the next. This sealant will also add to the durability of the costume, making it more resistant to tearing and general wear and tear during use.
Choosing a sealant specifically designed for fabric is important to maintain the flexibility of the costume material.
Visual Guide: Layering for Depth and Realism
The key to a realistic Hulk lies in layering colors. The following steps illustrate a possible approach:
- Base Coat: Apply a light base coat of a slightly desaturated green. This provides an even foundation for subsequent layers.
- Mid-tones: Apply a slightly darker shade of green to the areas that would naturally be shadowed, such as the recesses of the muscles and under the arms.
- Highlights: Using a lighter, brighter shade of green, highlight the areas where light would naturally hit, such as the peaks of the muscles and along the edges of the costume.
- Shadows: Add depth with a dark green or even a touch of brown in the deepest shadows, further enhancing the muscle definition.
- Dry Brushing: Use a dry brush with a darker shade to accentuate muscle texture and create a slightly rougher appearance.
- Sealant: Apply several coats of a flexible acrylic sealant to protect the paint job and add durability to the costume.
Budgeting and Material Sourcing: Diy Incredible Hulk Costume
Creating a DIY Incredible Hulk costume requires careful planning and resource management. A successful project hinges on effectively balancing cost with the desired level of realism and detail. This section details budgeting strategies and material sourcing options across different price points to guide your creation.
Budget Breakdown for Three Price Points
This table Artikels sample budgets for a DIY Incredible Hulk costume at low, medium, and high price points. These are estimates and can vary depending on location, sales, and specific material choices. Remember that purchasing used or repurposed items can significantly lower costs at all levels.
| Budget Level | Materials | Estimated Cost | Notes |
|---|---|---|---|
| Low ($50 – $100) | Used clothing (green shirt, pants), green fabric scraps, stuffing, face paint, craft foam | $75 | Requires significant scavenging and repurposing of existing materials. Limited detail and realism. |
| Medium ($100 – $250) | Green spandex or Lycra, muscle padding, sewing supplies, high-quality face paint, craft foam, possibly purchased muscle suit components | $175 | Allows for a more tailored and realistic costume. Prior sewing experience recommended. |
| High ($250+) | High-quality green Lycra or other specialty fabrics, professional-grade muscle suit, advanced prosthetics (optional), specialized paints and airbrushing equipment, detailed accessories | $350+ | Achieves a highly realistic and professional-looking costume. May require professional assistance or specialized skills. |
Material Sourcing Options
Acquiring the necessary materials involves exploring various avenues. Prioritizing cost-effectiveness and quality are key considerations.Online retailers like Amazon, eBay, and specialty costume supply websites offer a wide selection of fabrics, paints, and accessories. Craft stores such as Michaels and Joann Fabrics provide readily available materials like foam, paints, and sewing supplies. Thrift stores and secondhand shops are excellent sources for affordable clothing items that can be repurposed or modified.
Finally, fabric wholesalers can offer significant savings on larger quantities of material.
Cost-Effectiveness of Materials and Techniques
The cost-effectiveness of different materials and techniques is directly tied to the desired level of realism and the budget allocated. For example, using readily available green fabric from a craft store is less expensive than purchasing specialized Lycra from a costume supply store, but the final product may lack the desired stretch and fit. Similarly, hand-painting the costume is cheaper than using airbrushing techniques, but airbrushing can create a more professional and even finish.
Repurposing existing clothing items is often the most cost-effective approach, provided that the base material is suitable for modification. Consider the time investment as well; more complex techniques may require more time and skill, potentially offsetting the savings in materials.
FAQ Insights
What type of paint is best for the Hulk’s green skin?
Acrylic paints are generally recommended for their durability and ease of application on various materials. Consider using a high-quality acrylic paint designed for fabrics or plastics, depending on your chosen costume base.
How can I make the costume more comfortable to wear for extended periods?
Prioritize breathable materials for the inner layers of the costume. Consider using lightweight foam padding and ensuring adequate ventilation within the muscle suit. Regular breaks and hydration are also crucial for comfort during extended wear.
Where can I find patterns for the muscle suit?
While specific Hulk muscle suit patterns might be difficult to find, you can adapt existing muscle suit patterns or create your own based on body measurements and the desired level of muscle definition. Online resources and tutorials can provide guidance on pattern creation.
Can I use a store-bought muscle suit as a base?
Absolutely! Using a pre-made muscle suit can significantly reduce the construction time. You can then focus on customizing it with paint, additional padding, and accessories to achieve the desired Hulk look.


